Creating Tight Curls with Hairstyling Tools: 4 Tried and Tested Methods
One of the most popular short hairstyles this season is tight curls. This style can be achieved on any hair type provided you use the tools and products that are particularly suited for that hair type. Tight curls can be created with heat styling tools or no-heat methods. Both methods of achieving tight curls will be discussed to help you decide which is ideal for you.

No-heat methods include perm rods and Velcro rollers which take more than an hour to create tight curls. The heat-styling tools which can achieve the same style in less than an hour are the curling wand and hot rollers. Although it may be argued that a flat iron or curling iron can also be used for this purpose, these hot tools do not create tight curls as well as they create loose waves.
Read on to know how you can achieve tight curls with tools that use heat and tools that do not.
No-heat Methods for Creating Tight Curls
Perm Rods
It is best to start with clean, dry hair if you decide to perm it. Cleanse your hair the day before and let it air-dry. Divide your hair into many small sections (no more than 1 inch). Set the perm rods in your hair. You will need more than a dozen of these. It is recommended to use red perm rods for short hair. They are the smallest in size and will give you tight curls. For long hair, you can choose between blue and pink perm rods for tight curls.

Once the perm rods are set, squeeze the perm solution onto each and every section of your hair. Wrap your head with a shower cap to trap in the heat of the chemical solution. Leave it on for about 20 minutes before removing the shower cap.
Rinse your hair (with the perm rods still on) with warm water for 5 minutes to wash out all traces of the perm solution. Towel-dry your hair, then sit under a hood dryer for 10 minutes. Apply the neutralizer to each and every section of your hair before carefully unrolling the perm rods out of your hair one by one.
Apply a little more neutralizer to your hair before rinsing it again (without the perm rods this time) with warm water for 5 minutes to wash out all traces of the neutralizer. Towel-dry your hair, then apply a cocktail of curling mousse and shaping lotion to it. Blow-dry your hair and do not manipulate it any further to help the style last.


Velcro Rollers
Although any cold rollers will do the job, Velcro rollers are preferable because they have a strong grip and slide out easily without damaging your hair. Tight curls require small rollers, so keep them ready. As much as possible, wash your hair the day before to help you start with clean dry hair. Brush towel-dried hair to get rid of tangles and blow-dry until it is 80-90% dry, then divide it into 4 large sections and secure each with duckbill clips.

Start with the Mohawk section (at the crown of the head) and wrap a small sub-section of hair close to the hairline around a Velcro roller and, starting from the end, roll it away from the face and towards the scalp. Since Velcro rollers are self-gripping, there is no need for hairpins or hair clips to secure the rolled sub-sections. Repeat this with the rest of your hair, proceeding to the sides of your head and ending with the section near the nape of your neck.
After setting the rollers in your hair, mist a hairspray and leave the rollers until your hair is completely dry. Slide out the rollers slowly one after another and scrunch in a few drops of smoothing serum to prevent frizz and flyaways.
Heat-styling Tools for Creating Tight Curls
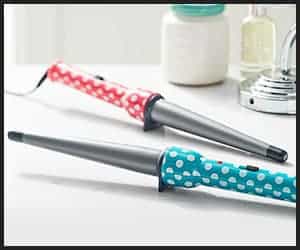
Curling Wand
This method works best on 2-day-old hair. Spray dry shampoo to build texture at the roots. Apply a heat protection serum combined with a curl definition cream and divide your hair into 2 sections. Tie up the top half of your hair into a bun and start curling the bottom half. Take small sections from the bottom half one at a time and wrap each around the barrel of the curling wand.
Make sure there is no gap between your hair as you roll it around the hot tool. This will ensure the curls are as tight as possible. Also, remember to roll the sections in alternating directions for a more natural look.
Wait at least 6 seconds before releasing your hair from the curling wand. The longer you wait, the tighter the curl will be. However, do not exceed 10 seconds or you will burn your hair because this heat-styling tool can heat up quickly.
Prior to curling the top half of your hair, create a side or center part (whichever flatters your face shape) and start curling from the center back. Also, make sure curls on the right fall to the right side and those on the left fall to the left side.
To avoid getting your hair tangled in the curling wand, unwind the hair slowly from the barrel of the hot tool. At the end of the curling process, scrunch your hair with argan oil for frizz control. Apply some more dry shampoo for a volume boost and finish off the style with a mist of freeze-hold hairspray. Needless to say, do not touch your hair for the rest of the day to keep those pretty ringlets intact.
Hot Rollers
This heat-styling tool has the advantage of achieving tight curls in relatively less time and with minimal effort. Wash your hair the night before and skip the conditioner, if possible, to help create the right texture. As the rollers are heating, blow-dry your hair if it is still damp. Detangle your hair with a wide-toothed comb and apply a curling product. Do not forget the heat protection serum.
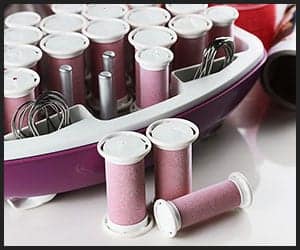
Divide your hair into 4 sections – the Mohawk, the 2 sides, and near the nape of the neck. Secure each section with hair clips and start curling from the nape of the neck. Take tiny sections and wind them around the heated rollers. Use small rollers to create tight curls. Leave the rollers in for 20 minutes or until the rollers have cooled completely.
To remove the cooled rollers, start from the Mohawk area, proceed to the sides and end with the bottom area. Mist a strong-hold hairspray, scrunching your hair a little. Your gorgeously styled tight curls will last the whole day.
Conclusion
The chopstick curler is the latest version of the curling wand. Its slender barrel makes it perfect for creating tight curls. This is why it is dubbed as the ‘tight curls wand’. However, it can cause arm fatigue. Perm rods are the most effective at achieving tight curls, but are time-consuming and require a second person to do the job. Velcro rollers give you a style that is long-lasting in a way that is less damaging. However, it requires the hairdryer to speed things up. Hot rollers create tight curls with the right roller size and save time and effort.
Regardless of which styling tool you choose, it is important to remember that your hair type will influence your choice to a large extent. Also, if you have naturally kinky hair, it is advisable to straighten your hair with a flat iron before styling it into tight curls. Last but not least, the styling product you use can spell the difference between tight and loose curls. For instance, a curling gel will achieve tighter curls whereas a curling mousse will create loose waves.
Sources
- Valentina Dokic, How To Get Tight Curls! (Curly Hair Tutorial) | Val Dokic, Jan 31, 2017
- KIM KIRSCH, The Tightly Curly Method, 7.29.11
- Instyle, How to Care for Tight Curls, Jul 26, 2016